Our Pool House Makeover: Turning an Unused Space Into a Cozy Guesthouse

Updated: Oct 9
When we first started talking about turning our pool house into a guesthouse, I had a vision in my head of what I wanted it to become. I wanted it to feel warm, cozy and inviting, a place where family and friends could stay and truly feel at home.
Of course, getting from the “before” to where we are now has taken a lot of decisions, a few changes of mind 😂, plenty of shopping, and a whole lot of work!
One of my favorite things about decorating is watching an idea slowly come together. I may be the one with the vision, but I’m very thankful for a husband who can take my ideas and actually figure out how to make them happen. 💗
This little space has already come such a long way, and I thought it would be fun to take you along for our pool house to guest house makeover, one project at a time. 💗
Where Our Pool House to Guest House Makeover Started

My brother-in-law has been staying in the pool house when he's home from work. He's a truck driver, so he's usually gone about three weeks out of the month and home for about a week at a time.
Over the years, I had also used the pool house to store quite a bit of my own stuff. And as you can probably tell from these before pictures, there was a LOT going on out there. 😂 Between my things and his things, there really wasn't much storage or organization for him when he was home.
So before the pretty stuff could happen, I started by going through everything and getting my own things out of there. A big part of this makeover wasn't just about making the space look better, it was about making it function better, too. I wanted him to have room for his clothes and belongings and for the whole space to feel less cluttered and more like an actual little home.
And once I started cleaning things out... well, you know how that goes. One thing led to another, and suddenly I wasn't just organizing anymore. 😂
The Bathroom Came First

The bathroom was the first place I decided to tackle. As you can see, it definitely needed a little love. 😂 The yellow walls, fish décor, colorful shower curtain, teal rugs and towels... it had all been there for a long time, and I was ready for something completely different.
I wanted this little bathroom to feel lighter, brighter and more like something you would find in a cozy guesthouse. Nothing fancy, just clean, warm and welcoming.
And of course, what started as “let’s just freshen up the bathroom” quickly turned into paint, new décor, new towels, a new shower curtain... and before I knew it, I was giving the whole room a makeover. 😂
But first came the paint.

The first thing I tackled was the paint. Just changing the wall color made such a difference! The old color made this little bathroom feel dark, so I wanted something lighter and softer that would brighten everything up and give me a fresh starting point. I went with Sherwin-Williams Shoji White, and I love how much warmer and brighter it made the space feel.
Of course, once the paint was done, I couldn't stop there. 😂 Next came the vanity, and
thankfully, I have a husband who can take my ideas and actually make them happen!

The pedestal sink was fine, but it didn't give us any storage at all and storage was one of the biggest things I wanted to improve throughout the pool house. So we replaced it with a vanity that gave us both a new look and some much-needed cabinet space.
This is where Marvin comes in. 😂 I can show him what I have in mind, and somehow he figures out how to make it work. He installed the vanity for me, and little by little, my vision for this bathroom was starting to come together.
The Details Started Bringing It Together

Once the vanity was in, the bathroom really started taking shape. I replaced the old oval mirror with a larger rectangular one and changed out the light fixture for a black four-light fixture. I also started bringing in black accents and hardware, which gave the room a more updated look and tied everything together.
It’s funny how much of a difference those little details can make. At this point, it was finally starting to look less like the old pool house bathroom and more like the cozy guest bathroom I had pictured in my head. 💗
The Finishing Touches
Once the bigger pieces were finished, it was time for my favorite part, the decorating! I brought in soft sage green accents with the rugs and towels, added simple artwork, and Marvin installed the floating shelves so I could add a few decorative touches without taking up any of our much-needed storage space.


I love how the black accents look against the Sherwin-Williams Shoji White walls, and the sage green added just enough color while still keeping everything soft and peaceful.
When I look back at where this little bathroom started, I can’t believe the difference. We didn’t make it bigger or completely gut the room, we just made better use of the space and gave it a fresh new look. And most importantly, we added some much-needed storage while making it feel like a bathroom our guests can actually enjoy. 💗

With the bathroom finished, I was so happy with how much brighter and more inviting it felt. But there was still a whole lot of pool house left to tackle. 😂
Remember all that stuff I told you I had stored out there? Well, it was time to start sorting, cleaning out and figuring out how to make the main room work better, too. And this was going to be a much bigger project!
Making Room in the Closet
After finishing the bathroom, the next place I tackled was the closet and this was another area where function really mattered.
I had quite a bit of my own stuff stored in there, so I went through everything and cleaned it all out. Once I got my things out of the way, I couldn't believe how much usable storage we actually had! That gave my brother-in-law a lot more room for his clothes and belongings when he's home.
While the closet was empty, I gave it a fresh coat of Sherwin-Williams Natural Linen, which is the color I chose for the main living area as well. Just cleaning everything out and adding fresh paint made the closet feel so much better.
We also decided it was time to replace the water heater. The old one was about 25 years old and was looking pretty corroded, so rather than wait for it to become a problem, we went ahead and replaced it while we were working on everything else.
It wasn't exactly the fun decorating part of the makeover 😂, but it was one of those practical updates that needed to be done and now we don't have to worry about it.

Tackling the Main Room

Before I could really start decorating, I had to make some room! One of the first big changes was selling the two retro bar tables and stools that had been out there for years. They were cute and had served their purpose, but they took up quite a bit of valuable floor space.
Since my goal was to make the pool house feel less cluttered and give my brother-in-law more room for his things, I knew they needed to go. Between selling the tables and stools and going through all the things I had stored out there, the room finally started opening up.
Sometimes a makeover isn’t about what you add, it’s about what you’re willing to let go of. And apparently, I had plenty to let go of. 😂
Finding the Right Paint Color
Next up was paint and this one took a little trial and error. 😂
When I started painting the closet, I originally chose Sherwin-Williams Accessible Beige. I painted a pretty good-sized section of the wall with it, but once I saw it in this space, I just didn't love it. With the lighting in the pool house, it pulled really gray on the walls, and that wasn't the warm, cozy look I was going for.
So... back to the paint colors I went! 😂 I switched to Sherwin-Williams Natural Linen, and as soon as I started putting it on the walls, I knew I liked it so much better. It gave me the warmer, softer neutral I had pictured for the space.
That's one thing I've learned about paint colors, they can look completely different in your own home than they do on a little paint swatch. Don't be afraid to change your mind if a color isn't giving you the look you wanted. I'm certainly glad I did!
Once I settled on Natural Linen, I used it in the closet and then carried that same color into the main room.

Once I finally settled on Sherwin-Williams Natural Linen, it was time to say goodbye to all that yellow! 😂 I painted the entire main room, and I couldn't believe how much the space changed with paint alone.
The Natural Linen gave me exactly what I was looking for, a warm, neutral backdrop that made the room feel lighter, calmer and so much more inviting. It also gave me a blank canvas for everything I had planned next.
And believe me... I had plans. 😂
Making the Layout Work Better
As I started painting the main room, we were also figuring out how to make the layout work better.
One thing I really wanted to do was move the stereo cabinet. It was sitting between the closet and bathroom doors, and I wanted to move it to the other side of the bathroom door. That would give us more room around the bed and make it much easier to walk into the closet.
Sounds simple, right? 😂 Well... not quite.
The speaker wires for our outside speakers came through that wall, which meant the stereo cabinet pretty much had to stay where it was unless we could reroute the wires.
Marvin climbed up into the attic through the access in the closet, but there wasn't enough room for him to get over the A/C unit to where he needed to be.
And that's when J'Ray became our hero! 💗
He was small enough to climb over the A/C unit, get to the other side and help us get a hole drilled where we needed it for the speaker wire. Thanks to him, we were finally able to move the stereo cabinet to the other side of the bathroom door and open up that whole area.
Sometimes remodeling takes a whole team... and sometimes the smallest member of the team saves the day. 😂


And Elvis Has Left the Building 😂
I have to share one little decorating moment that still makes me laugh. The pool house had this Elvis picture hanging on the wall, and while I have nothing against Elvis 😂, he just wasn’t quite fitting the look I had in mind for the new guesthouse.
Then I found this pretty picture at Hobby Lobby for a really good deal, and I knew exactly where I wanted to put it. So down came Elvis and up went my new picture.
As soon as I hung it, I looked at Marvin and said, “Elvis has left the building. Thank you and good night!” 😂
Sometimes it’s the simplest little changes that make a room start feeling completely different and this one still makes me smile.


Creating the TV & Fireplace Feature Wall
Once the walls were painted, it was finally time to start bringing some of my ideas for the room to life.
We moved the bed over to the other side of the room near the closet, which opened up the wall across from it. I knew I wanted that wall to become the focal point of the room—with the TV, an electric fireplace and a mantel all together.
Of course, I had the vision in my head... and Marvin was the one who had to figure out how to actually build it. 😂💗

Once I showed Marvin what I had in mind, he got to work figuring out how to make it happen. He started by building the frame right onto the wall, making sure there was a place for the TV, fireplace and mantel. This is one of those projects where I had the idea... and he had to do all the measuring, cutting and figuring out how to actually make it work. 😂

Watching it come together was so much fun because this was the point where I could finally start seeing what I had pictured in my head. Marvin built the entire frame himself, and little by little that plain wall was turning into the focal point I had imagined.

There was a lot more to this project than just putting some boards on the wall! Marvin measured and cut everything himself, and somehow managed to take the picture I had in my head and turn it into something real. I’m pretty sure there were a few times he wondered what he had gotten himself into. 😂

And then came the part I had really been waiting for, the color! 😍 Once those boards started going up, the whole wall began to change. I loved how the soft sage green added just enough color to the room while still keeping everything warm and cozy.

At this point, I was getting excited because I could finally see the whole thing coming together! The TV and fireplace were in place, the boards were going up, and what had started as just an idea was actually starting to look like the cozy feature wall I had imagined. 💗

Of course, we had one little problem with the mantel. 😂 The one I bought was 9 inches deep, and once we got it in the room, I realized it stuck out farther than I wanted. I really didn’t want to have to buy another one, so Marvin figured out how to cut it down from 9 inches to 6 inches deep. Problem solved—and I actually like it even better this way! 💗

I absolutely LOVE how it turned out! 💗 The sage green, the rustic wood mantel and the fireplace gave the room exactly the warm, cozy feeling I was hoping for. It completely changed that side of the room and became the focal point I had pictured from the very beginning. And I have to give Marvin a lot of credit once again, I had the vision and he figured out how to make it happen. 😂💗

And once I added a few little touches to the mantel, it finally started feeling less like a project and more like home. 💗
Creating a Cozy Sleeping Area
With the feature wall finished, I turned my attention to the sleeping area. Since we were turning this into a guesthouse, I wanted it to feel comfortable and cozy, but I also needed to make the most of the space we had. I found a new bed that lifts up to reveal storage underneath which was perfect because you can never have too much hidden storage! 😂
I also bought new nightstands for each side of the bed and added wall sconces above them. I really liked the idea of putting the lights on the wall instead of taking up space on top of the nightstands, and they ended up giving the whole area a more finished look.

I love how this little sleeping area turned out! 💗 Between the hidden storage under the bed, the new nightstands, the wall sconces and the soft sage and neutral colors, it finally started feeling like a real guest room instead of the old pool house we started with.
Adding a Cozy Place to Sit
Once the sleeping area was coming together, I knew we needed a comfortable place to sit too. I found a couch that fit the space perfectly, then added a narrow side table and a lamp beside it. I finished it off with some cozy pillows and a throw, and little by little this side of the room started feeling like an actual living area instead of just one big open pool house. 💗

Saying Goodbye to Those Red Countertops 😂
Next up were those red countertops and I was more than ready to see them go! 😂 We removed the old countertops, and while everything was torn apart, Marvin also cut down the raised bar so the entire countertop would be one level. I knew that would open up the space and give the kitchen a much cleaner, more updated look.

Taking those countertops out made a huge difference right away, but the biggest change was getting rid of that raised bar. Marvin cut the bar down so the new countertop could run across the whole area at one level. It may not sound like a huge change, but it completely opened up the space and made the kitchen feel so much bigger.
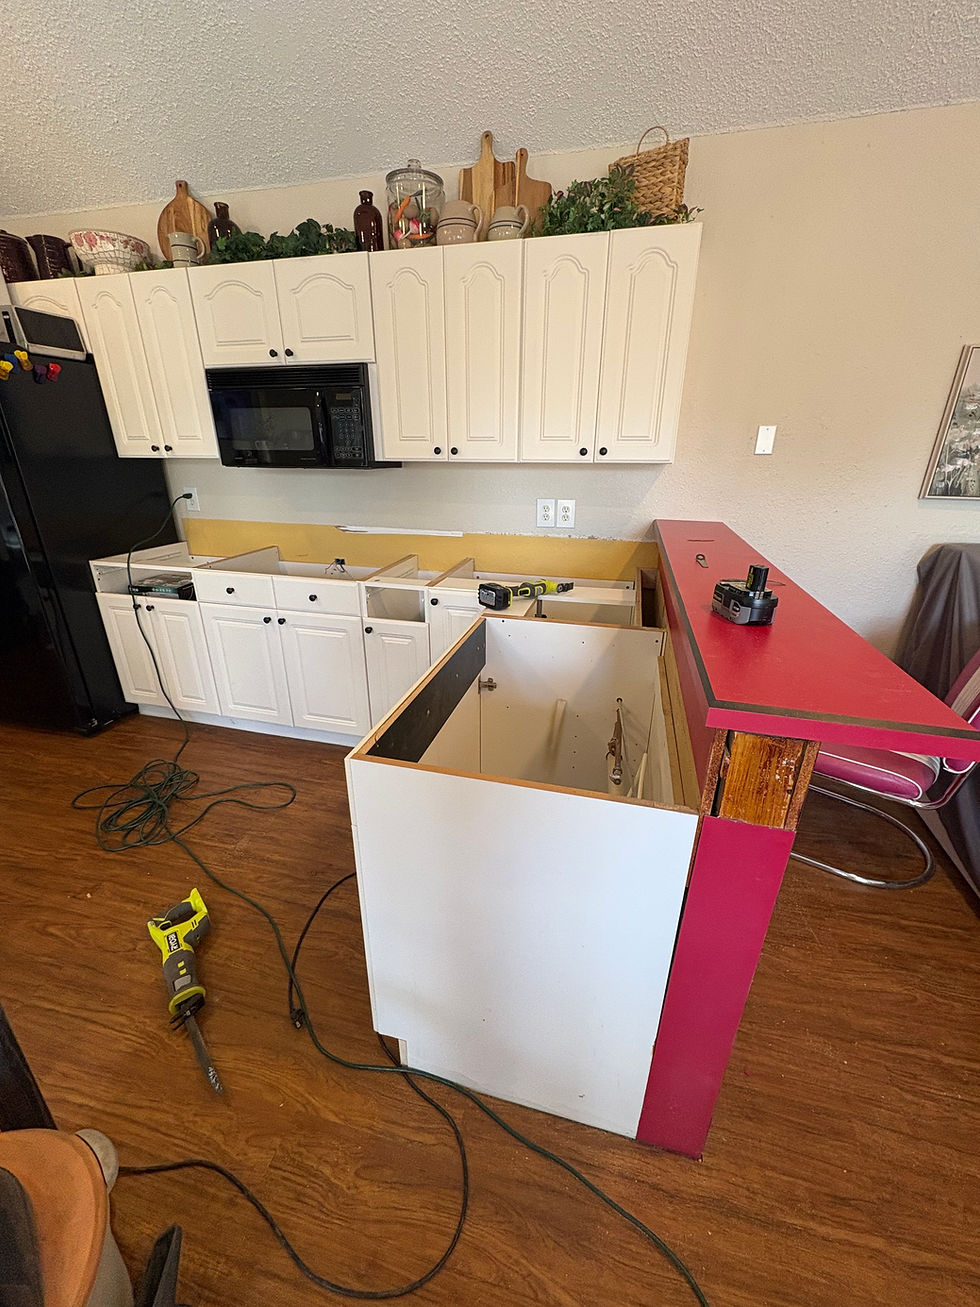
Once the old countertops were off, there was no turning back! 😂 With everything opened up, Marvin could start working on that raised bar and getting it down to the same height as the rest of the cabinets. This was definitely one of those stages where the room looked a whole lot worse before it started looking better!

Down came the bar! 😂 Once Marvin cut it down, I could already tell how much better the kitchen was going to feel with one continuous countertop. It opened up the room and made the kitchen and living area feel much more connected.

Once the raised bar was gone, we still had to figure out what to do with the outside of the peninsula. There was also some water damage along the bottom of the cabinet, and since this is one of the first things you see when you walk through the door, I really wanted to cover that up and give the whole thing a more finished look. We decided to cover it with cabinet-grade maple plywood and then, instead of buying decorative trim, we used yardsticks to add a little detail. Yep...yardsticks! 😂 Sometimes you just use what works!

Once our fancy yardstick trim was in place 😂, it was my turn to paint. I used a basic Sherwin-Williams white cabinet paint so everything would blend in with the existing cabinets. Once it was all painted, you would never know we were trying to cover up water damage, it just looked like it had always been part of the kitchen. And not too bad for a few yardsticks! 😂

I was so happy with how this turned out! What started as a way to cover up an area we didn’t love ended up looking like an intentional little upgrade. And the fact that part of it was made with yardsticks just makes me love it even more. 😂💗

Choosing the New Countertops
With all the prep work finished, it was finally time for one of the changes I had been looking forward to the most, the new countertops! We went to Home Depot and picked out Calacatta Idillio quartz with an eased edge. I wanted something light and bright with enough veining to add some character, and I think this is going to look so pretty with the white cabinets. 😍

Of course, new countertops meant a couple of other changes too. 😂 The sink we already had was a drop-in sink, but with the new quartz I wanted an undermount sink. We bought a white 32-inch double-bowl 50/50 undermount sink, and I also ordered a new matte black kitchen faucet from Amazon that includes a separate drinking-water faucet for our filtration system. I think the black is going to look so good against the white sink and quartz! 😍
Before they could come out to measure for the countertops, we had to have the new sink and faucet here and ready to go. Once everything arrived, they came out and measured the kitchen for the new quartz. After that, I received the countertop drawing to review and approve, along with photos of our actual slab. I approved everything, so now we’re officially in the waiting stage! 😍 I cannot wait to see those red countertops replaced with this beautiful quartz.
The Countertops Are In! 😍
And they’re finally IN! I cannot believe the difference these countertops made in this little kitchen. We chose Calacatta Idillio quartz, and I absolutely love how it turned out. The white background and soft gray veining brighten up the whole space and looks so good with the white cabinets.

When I look at these two pictures side by side, I almost can’t believe it’s the same kitchen! 😂 Those red countertops are gone, the raised bar is gone, and everything feels so much brighter and more open.
Cutting down that old raised bar was definitely the right decision. Having the countertop all one level made such a difference, and I love how the lattice we added to the end finished everything off.
We also installed the new white undermount sink and matte black faucet, and I love the contrast against the quartz. It finally feels like all of those little decisions are coming together! ❤️

The Transformation Isn’t Finished Yet…
We’re getting SO close to the finish line now! The countertops are in, the backsplash is finished, and this little pool house is looking more and more like the cozy guesthouse I pictured in my head. ❤️
There are still a few finishing touches and decorating projects I want to do before I call this makeover completely finished, but honestly, seeing how far this space has come already makes me so happy.
I’ll keep sharing the rest of the transformation as we go, and of course, when everything is finished, I’ll share the full Pool House before-and-after reveal! 💕
And if there’s one thing this project has reminded me of, it’s that you don’t have to do everything at once. Sometimes you just start with what you have, tackle one project at a time, and enjoy watching your vision slowly come to life.
Thanks for following along with another one of my crazy ideas and a big thank you to Marvin for always being willing to figure out how to make those ideas actually happen. 😂💗
Comments